FaceFusion Common Issues and How to Fix Them
So you installed FaceFusion, loaded your video, hit Start, and... something went wrong. Maybe the swapped face keeps blinking back to the original. Maybe the program is painfully slow. Maybe the final video has no sound. Or maybe you just got a scary-looking error message and have no idea what it means.
You are not alone. These are the most common problems people run into when using FaceFusion for video face swaps, and every single one of them has a fix. This guide walks you through each issue step by step, in plain English, so you can get back to creating.
New to FaceFusion? Start with our beginner's installation guide first, then come back here when you hit a snag.
The Swapped Face Flickers or Disappears on Some Frames
This is the number one frustration for video face swaps. You watch your finished video and the swapped face looks great on most frames, but every few seconds it "flickers" — the original face pops back in for one or two frames, then the swap returns. It looks like a glitch.
Why This Happens
FaceFusion processes your video one frame at a time. On each frame, it needs to find a face before it can swap it. When the person in the video turns their head, moves quickly, walks into a shadow, or gets partially blocked by their hand or hair, FaceFusion's face detector might not see a face on that frame. When it cannot find a face, it leaves the frame untouched — and that is the "flicker" you see.
If you are using Reference mode (the default), FaceFusion also compares each detected face against a reference image to make sure it is swapping the right person. If the face in a particular frame looks too different from the reference (different angle, different expression, different lighting), FaceFusion skips it even though it found a face.
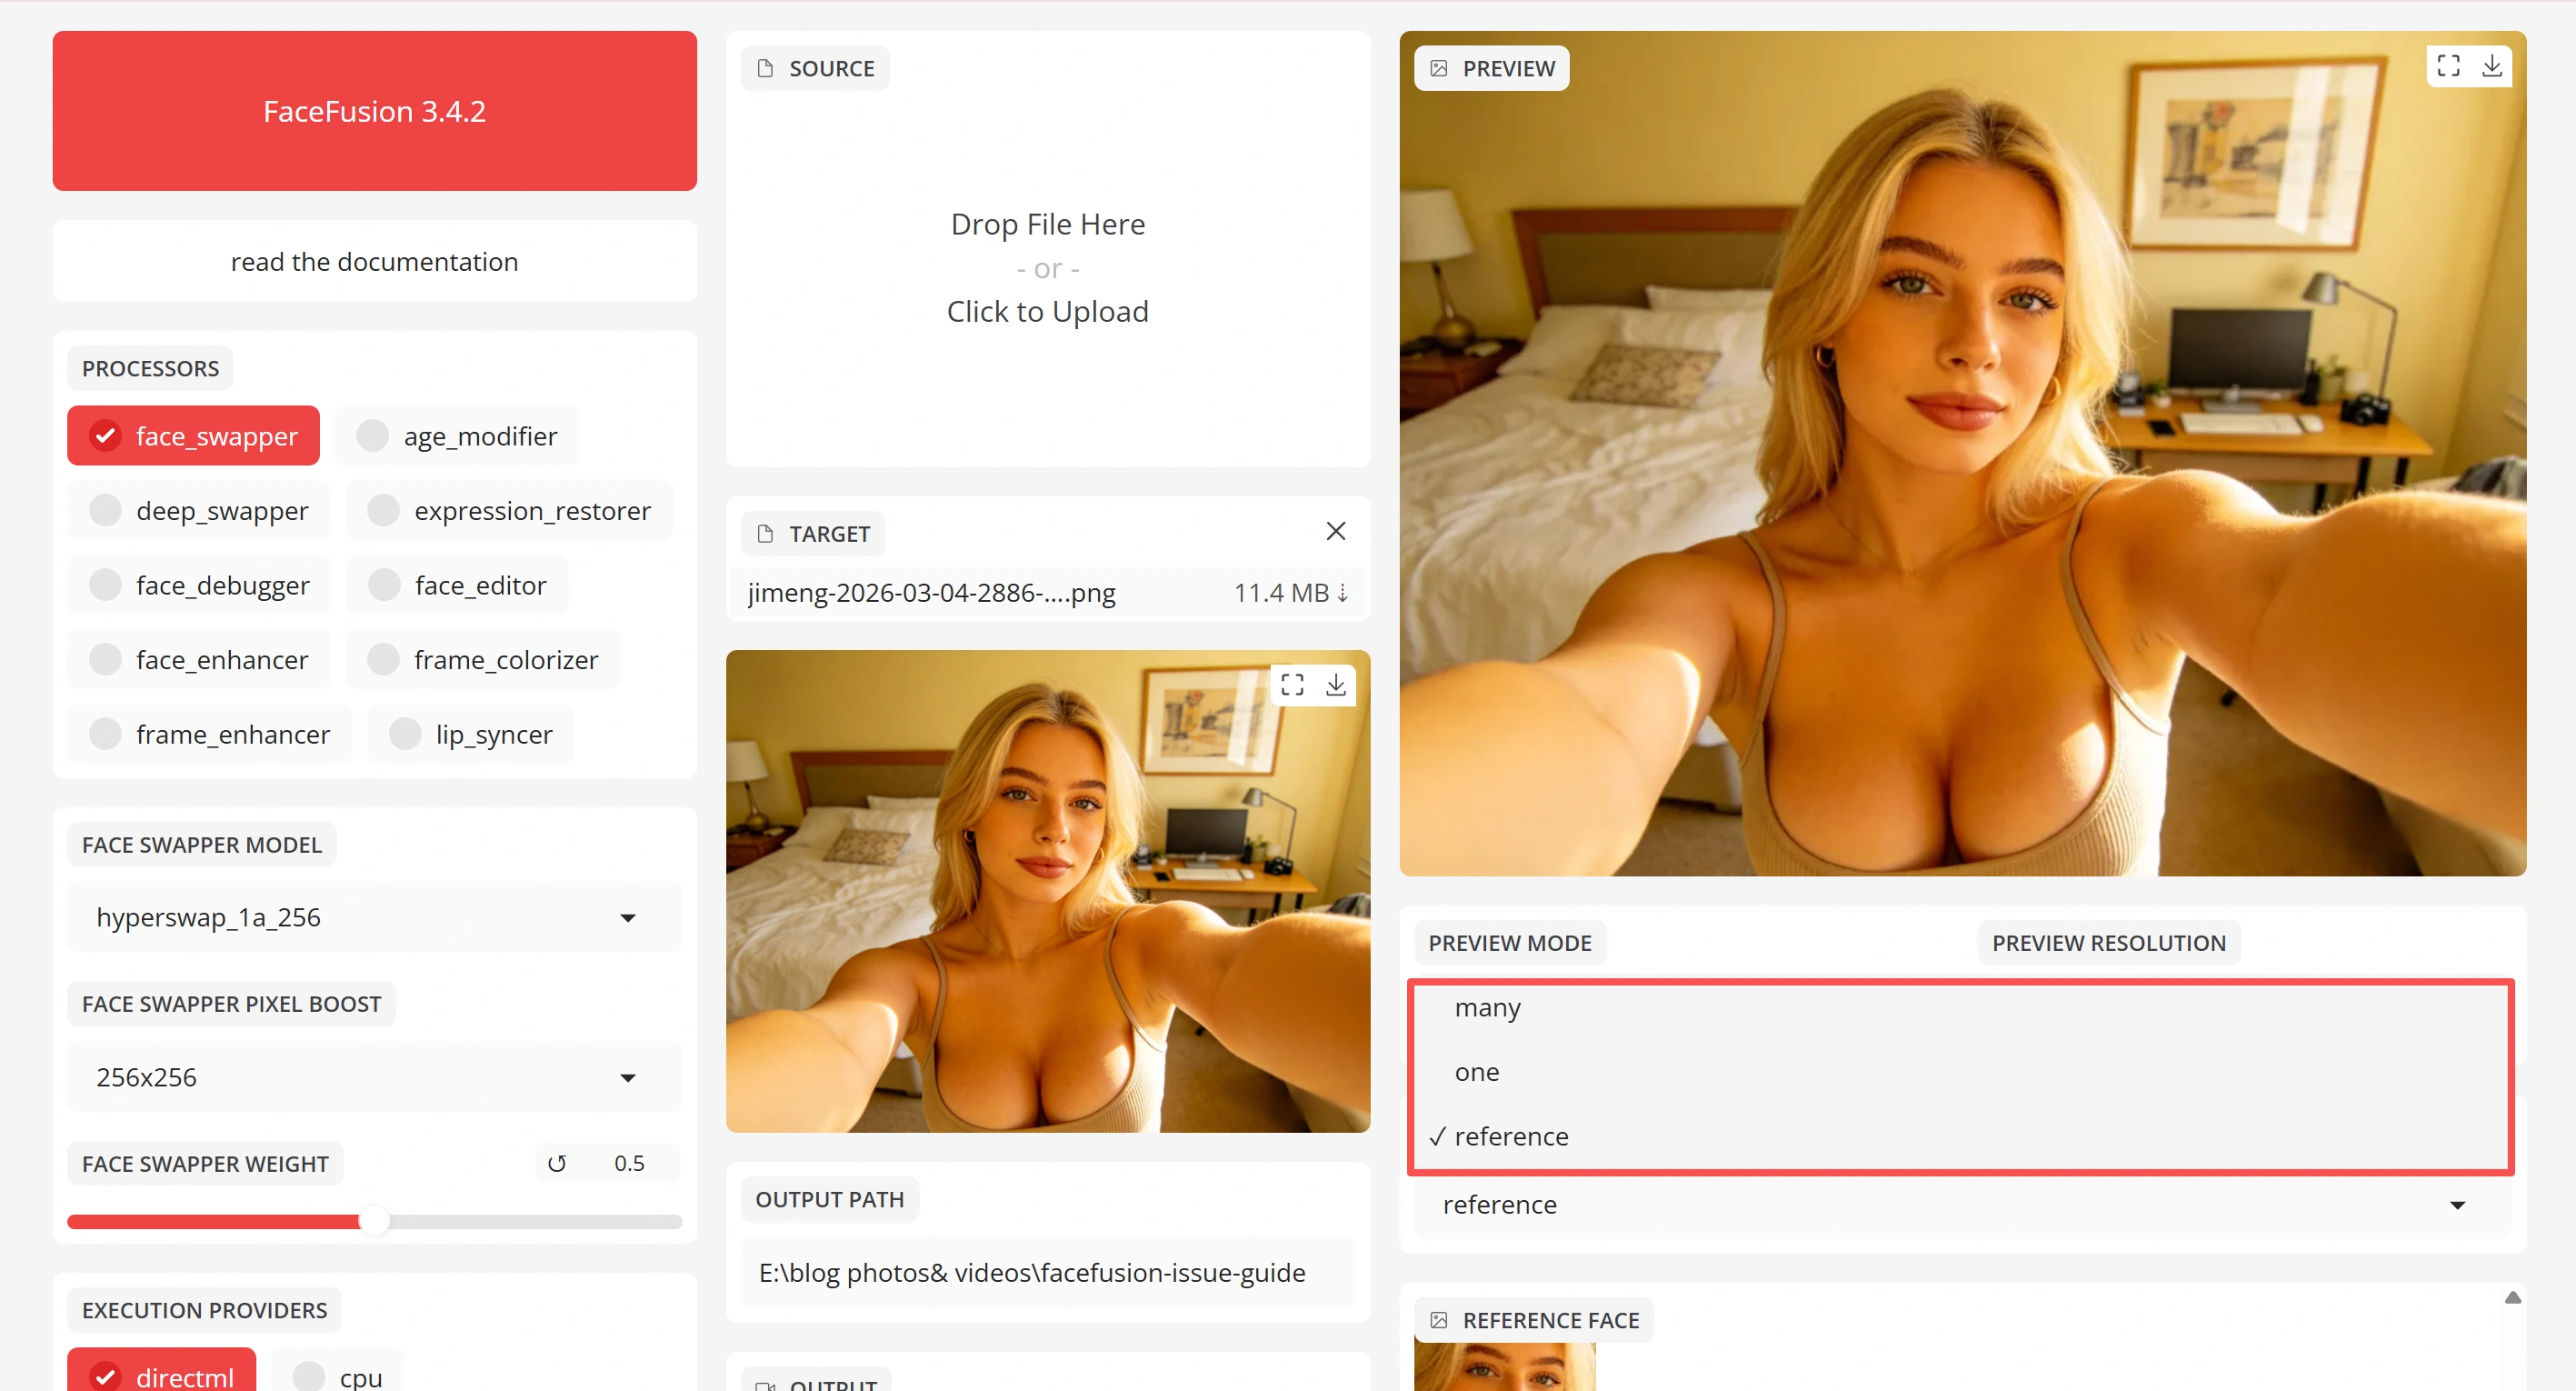
Fix 1: Switch Face Selector Mode to "One"
This is the single most effective fix, recommended by the FaceFusion developer himself.
Instead of Reference mode, switch to "One" mode. In this mode, FaceFusion simply swaps the most prominent face it finds in every frame — no reference matching required.
Where to find it: In the FaceFusion UI, look for Face Selector Mode and change it from "Reference" to "One".
When to use it: Any video where only one person's face appears. If multiple people are in the video and you only want to swap one of them, you will need to stick with Reference mode and use the other fixes below.
Fix 2: Lower the Face Detector Score
The Face Detector Score is like a confidence threshold. The default is 0.5, which means FaceFusion only treats something as a face if it is at least 50% sure. That sounds reasonable, but it means blurry frames, side profiles, and dimly lit shots often get skipped.
Lower it to 0.3 (or even 0.2 for really difficult footage). This tells FaceFusion: "If you think there is even a 30% chance that is a face, go ahead and swap it."
Trade-off: If you go too low (below 0.2), FaceFusion might start "seeing" faces in places where there are none — like a pattern on a shirt or a poster in the background. If that happens, bump it back up slightly.
Fix 3: Increase the Reference Face Distance
If you must use Reference mode (because multiple people are in the video), increase the Reference Face Distance from the default to 0.8.
Think of this number as "how different can the face look from the reference and still be considered a match." A higher number means more tolerance. This helps when the person turns their head far to the side or makes an exaggerated expression.
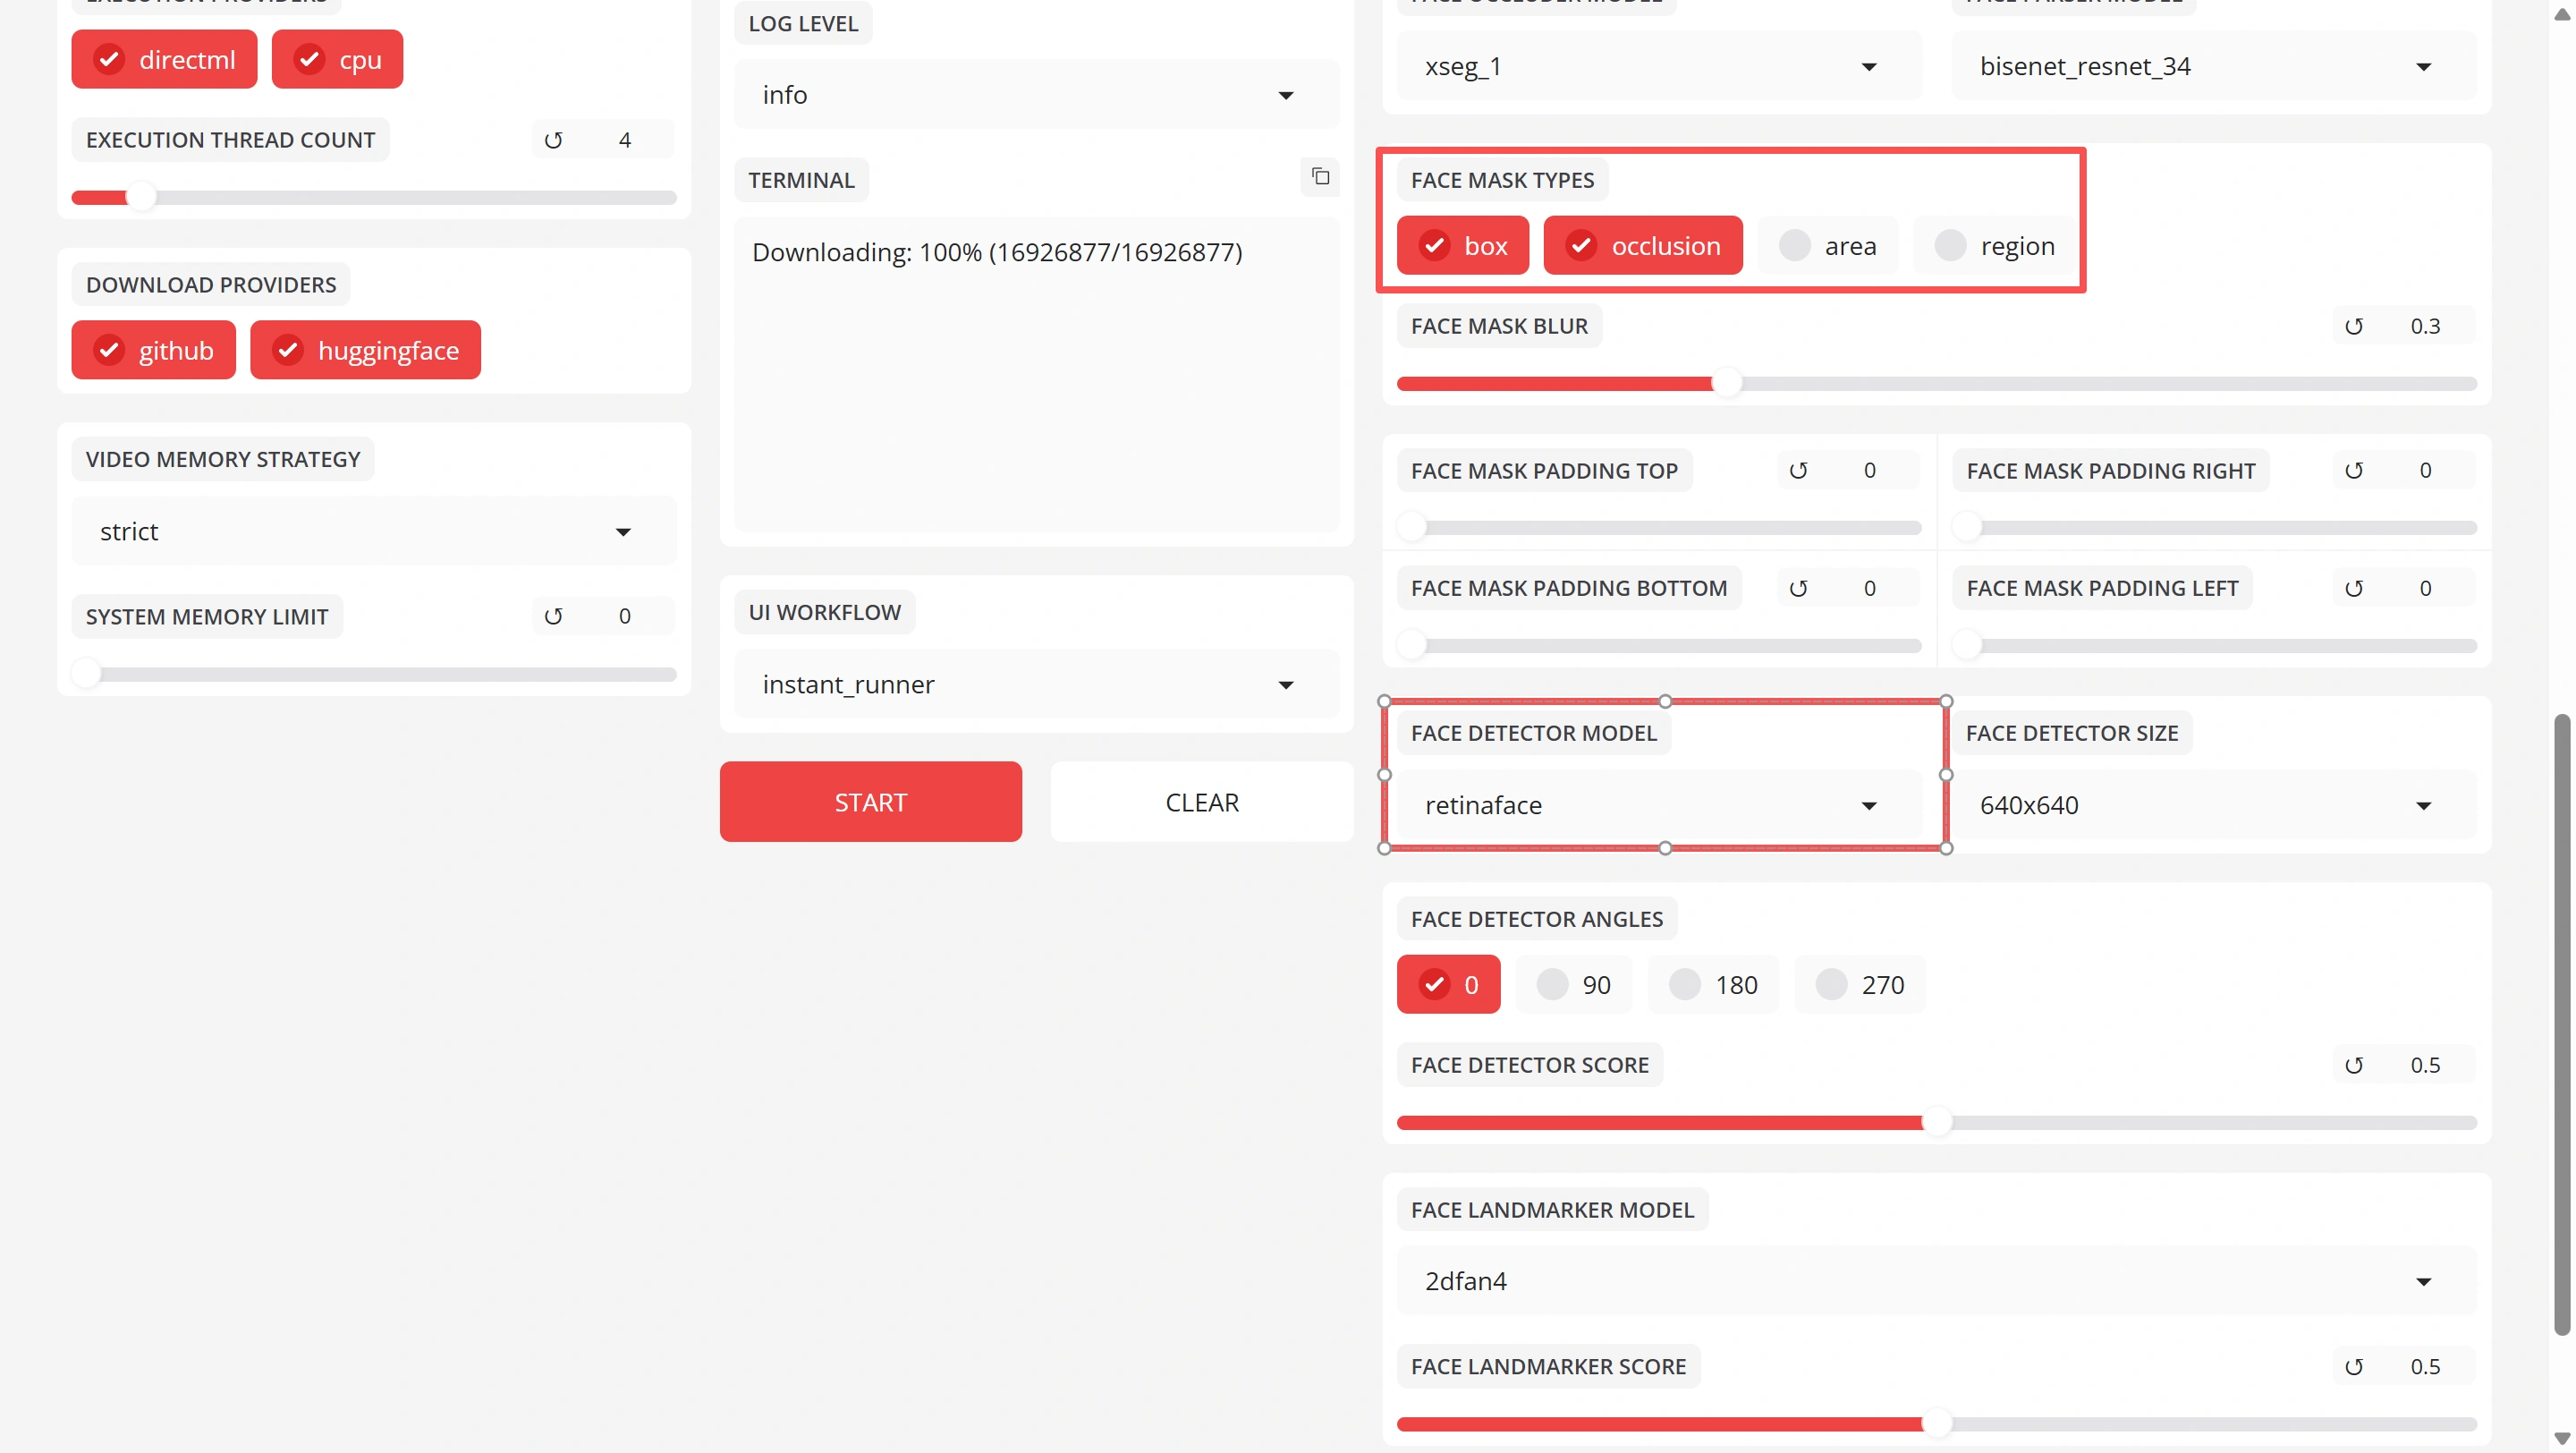
Fix 4: Switch to the RetinaFace Detector
FaceFusion has several face detection models built in. RetinaFace is generally the best at finding faces at difficult angles and in poor lighting.
Where to find it: Look for Face Detector Model in the settings and switch to RetinaFace.
Quick Reference: Anti-Flicker Settings
| Setting | Default | Anti-Flicker Value | What It Does |
|---|---|---|---|
| Face Selector Mode | Reference | One | Skips reference matching entirely |
| Face Detector Model | varies | RetinaFace | Better detection at tough angles |
| Face Detector Score | 0.5 | 0.2 – 0.3 | Catches faces the AI is unsure about |
| Reference Face Distance | 0.6 | 0.8 | Allows more face variation between frames |
| Face Mask Types | box | occlusion | Handles partially covered faces |
| Face Mask Blur | 0 | 0.3 – 0.5 | Smoother blending at mask edges |
FaceFusion Is Too Slow or Keeps Crashing
If FaceFusion is taking forever or crashing in the middle of processing, the problem is almost always related to how it uses your hardware.
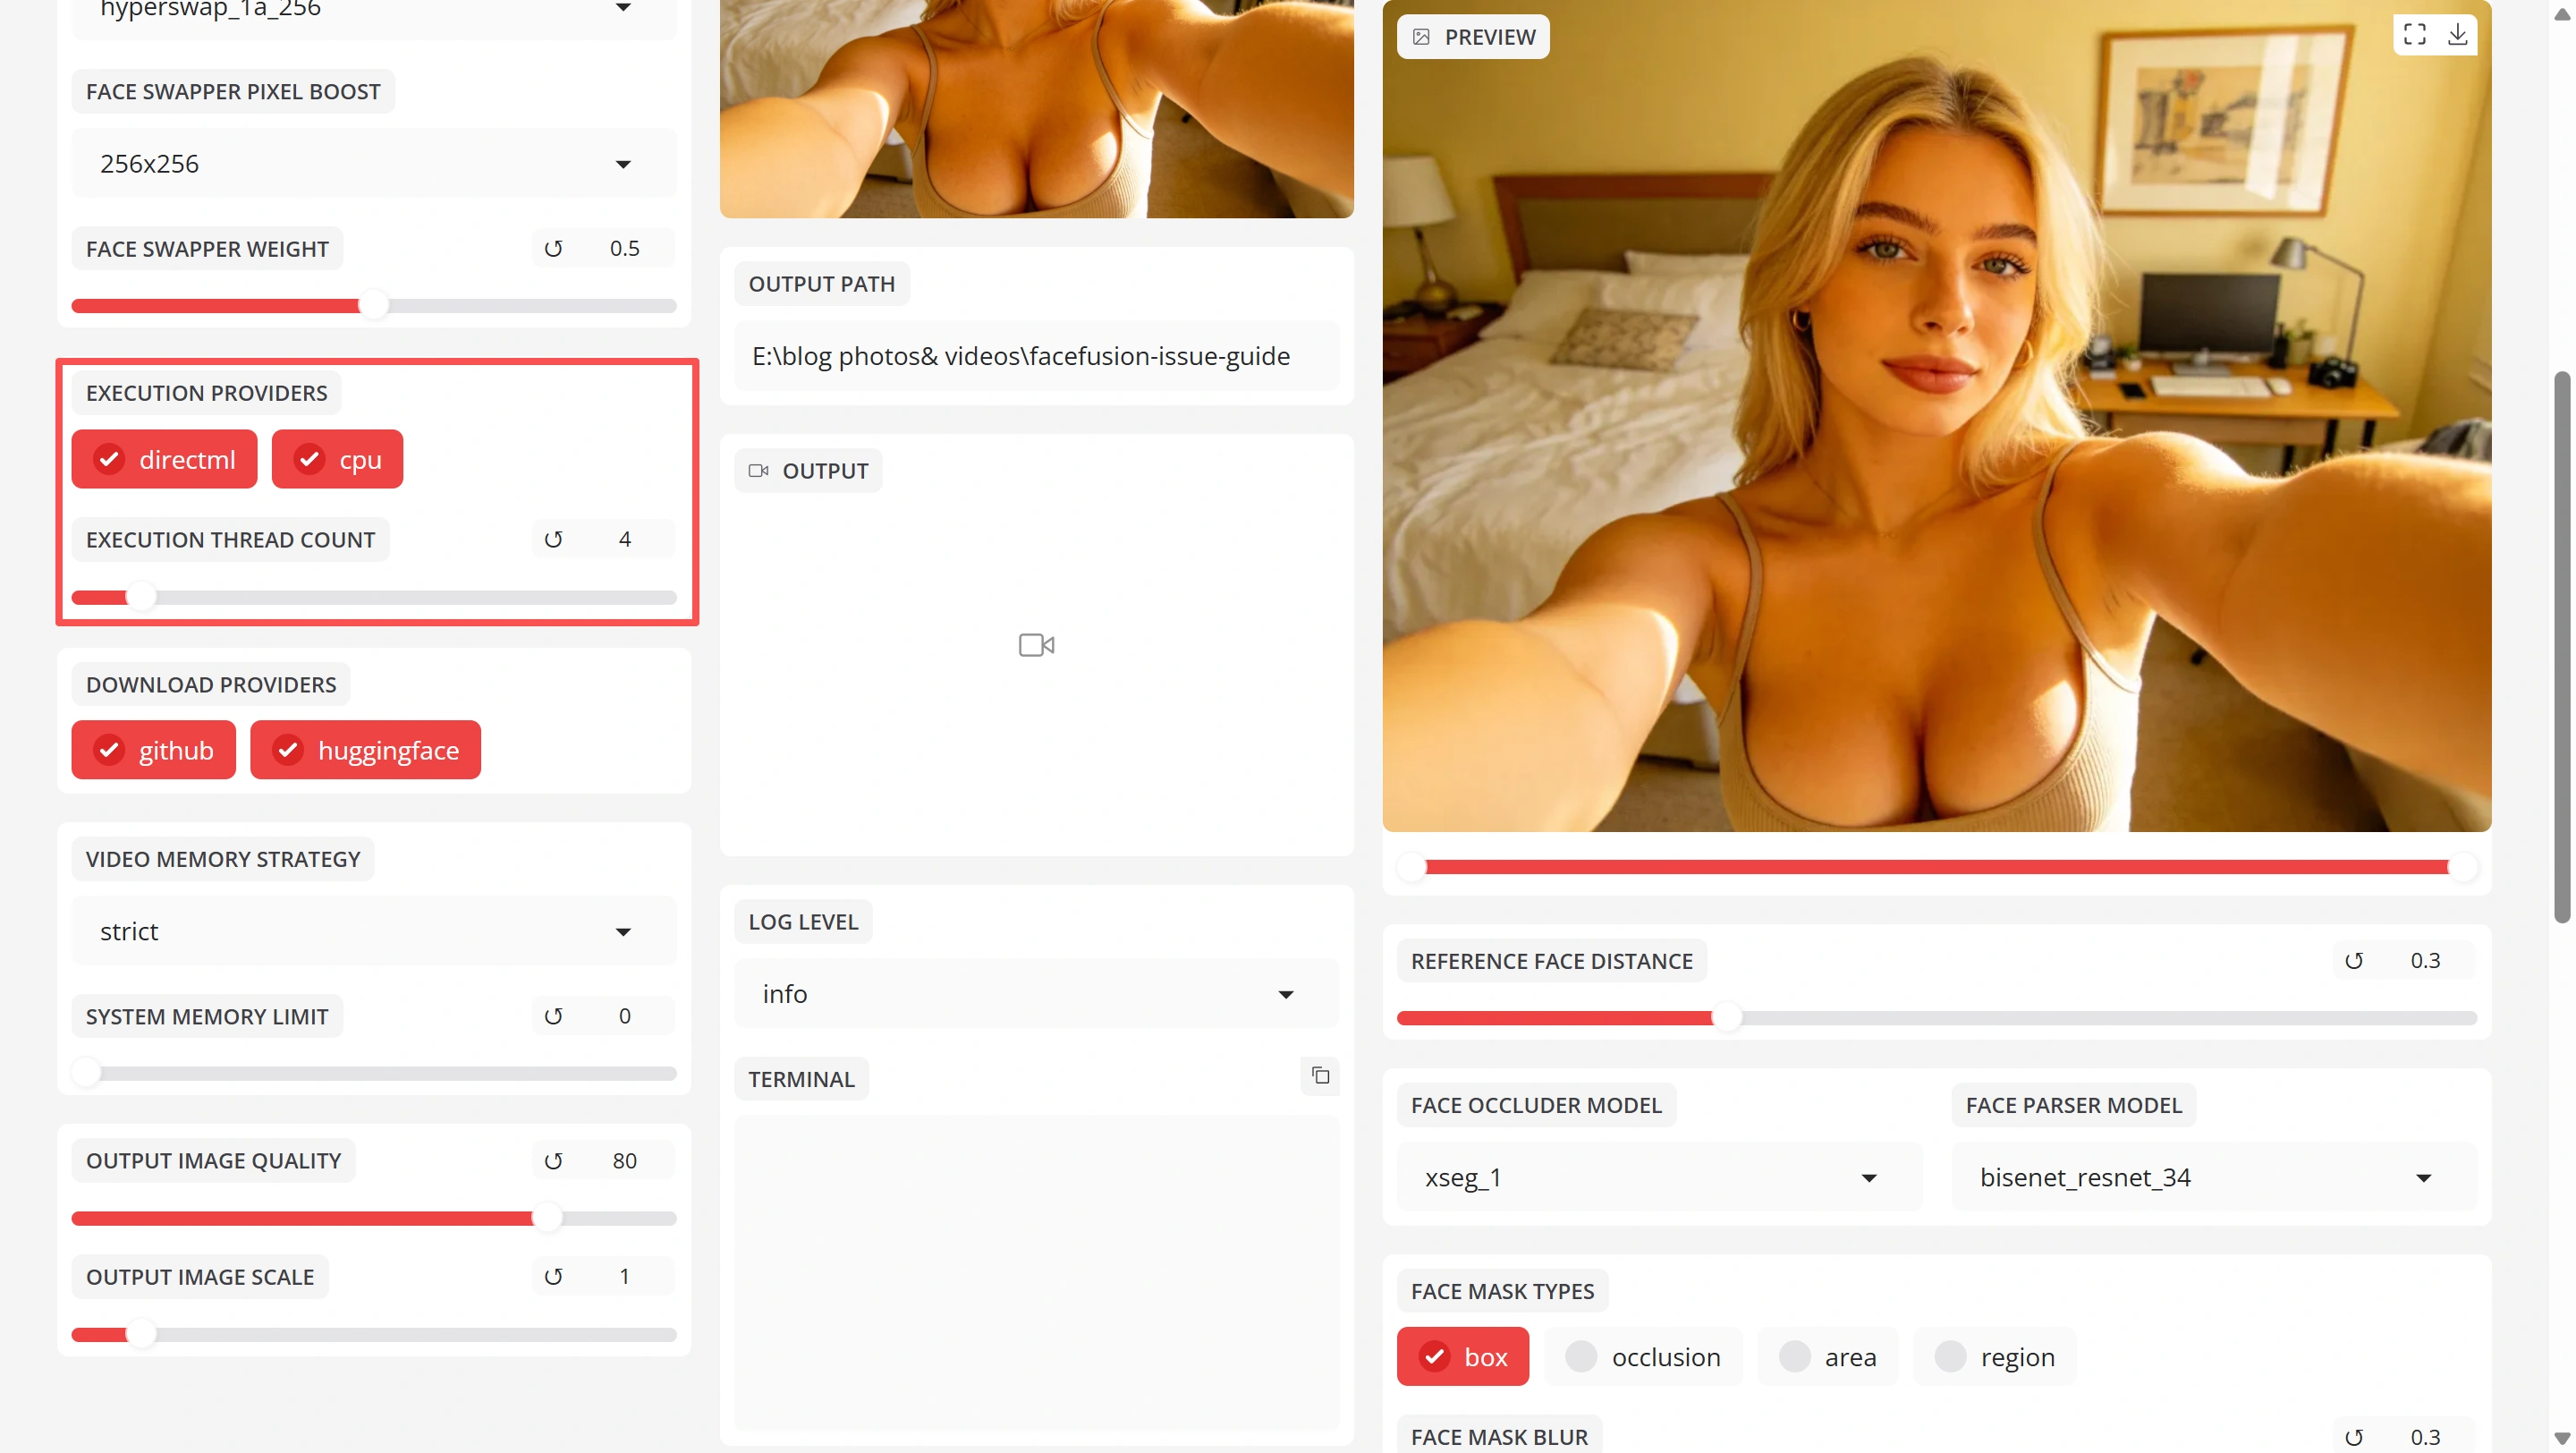
The Most Common Cause: Running on CPU Instead of GPU
FaceFusion can run on your CPU (the main processor in your computer) or your GPU (the graphics card). The GPU is 10 to 50 times faster for face swapping. If FaceFusion is processing at 1-2 frames per second, it is probably using your CPU.
How to check: Look at the Execution Provider setting. If it says "cpu", that is your problem.
How to fix it:
- NVIDIA GPU: Set Execution Provider to cuda. Make sure you have installed the CUDA toolkit and cuDNN.
- AMD GPU: Set Execution Provider to rocm (Linux only). AMD GPUs are not supported on Windows for FaceFusion.
- Apple Silicon (M1/M2/M3/M4): Set Execution Provider to coreml.
Your GPU Runs Out of Memory (VRAM)
If FaceFusion crashes with a "CUDA out of memory" error, your graphics card does not have enough video memory (VRAM) to handle the current workload.
Quick fixes:
- Reduce Execution Thread Count to 1. Each thread uses VRAM. Fewer threads = less memory used.
- Set Video Memory Strategy to strict. This tells FaceFusion to use as little VRAM as possible.
- Lower the video resolution before processing. A 1080p video uses roughly 4x more memory than a 720p video.
- Close other programs that use your GPU (games, video editors, other AI tools, even browser tabs with video playing).
Performance Tips From the Developer
The FaceFusion developer shared these tips for getting the best speed:
- Use FFmpeg 7.0.2 or earlier. There is a known speed regression in FFmpeg 7.1.0 and later that slows down video merging.
- If you use Windows, exclude FaceFusion's temp folder from Windows Defender real-time scanning. Defender scans every temporary frame file, which can slow processing by 20-30%.
- Linux is about 20% faster than Windows on identical hardware, if you have the option.
Hardware Recommendations
| Your Budget | GPU to Buy | Expected Speed |
|---|---|---|
| Entry (~$300) | RTX 3060 12GB | 8–12 frames/sec |
| Mid (~$450) | RTX 4060 Ti 16GB | 15–20 frames/sec |
| High (~$800) | RTX 4080 16GB | 25–30 frames/sec |
| Best (~$1500) | RTX 4090 24GB | 30–40 frames/sec |
How much VRAM do you need? For basic video face swap, 8 GB is the comfortable minimum. If you want to run the face enhancer on top of the swap (which makes results look much better), aim for 12 GB or more.
Best Settings for Video Face Swap
FaceFusion's default settings are designed to work on as many computers as possible. They are not designed for the best quality. Here are the settings the community has found work best for video.
The Settings That Matter Most
| Setting | Recommended Value | Why |
|---|---|---|
| Face Swap Model | hyperswap_1a_256 | The newest, highest-quality swap model (256px resolution) |
| Face Enhancer | GFPGAN 1.4 | More stable across frames than CodeFormer — less flicker |
| Enhancer Blend | 65 – 75% | Lower blend = less flicker. Never use 100% for video |
| Pixel Boost | 512 | Higher values barely improve quality but massively slow processing |
| Face Detector | RetinaFace | Best face alignment accuracy |
| Face Detector Score | 0.3 – 0.5 | Lower for difficult footage, higher for clean footage |
| Face Mask Types | occlusion | Handles hair, hands, glasses over the face |
| Face Mask Blur | 0.3 | Hides the swap boundary without a visible halo |
| Keep FPS | Enabled | Ensures output matches original video frame rate |
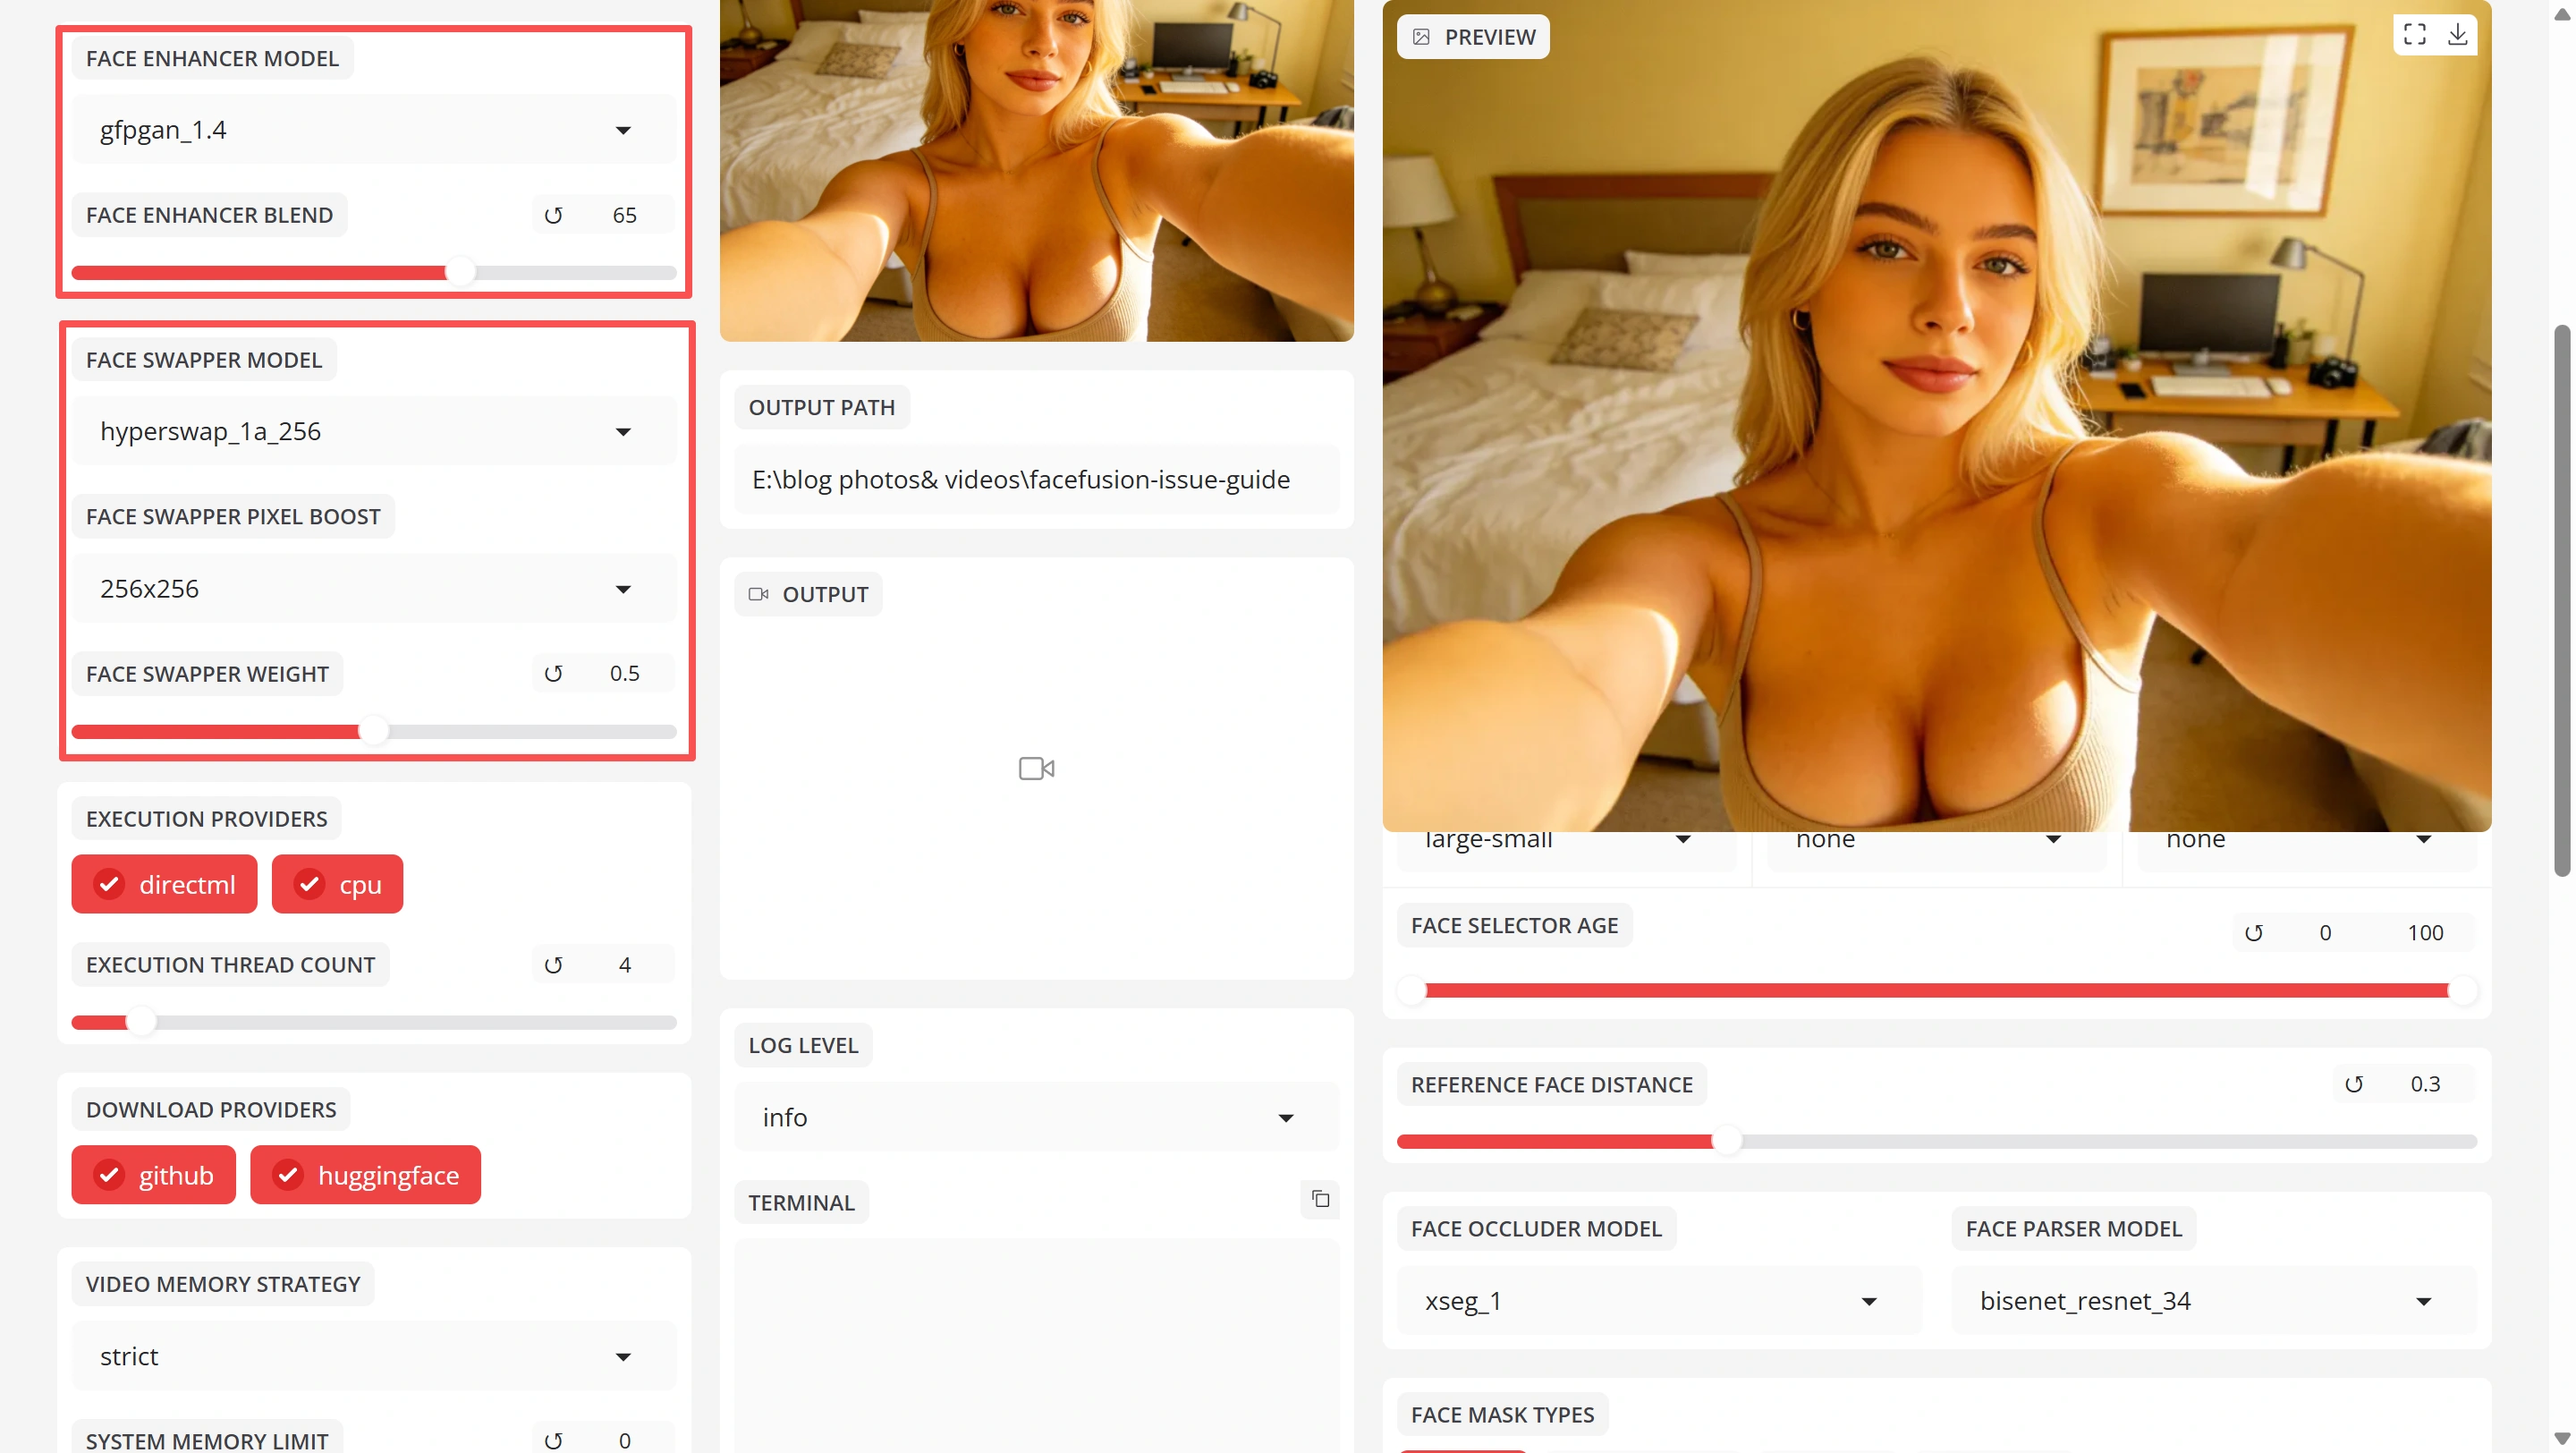
The Number One Mistake: Face Enhancer at 100%
This deserves its own section because it is the single most common cause of "my face swap looks fake."
When you set the Face Enhancer blend to 100%, the enhancer completely replaces the face texture with AI-generated skin. This AI-generated texture is slightly different on every frame, which creates visible flickering. It also makes the face look "too smooth" — like plastic.
The fix is simple: Set the blend to 65–75%. This gives you the benefit of the enhancer (sharper details, better skin) while keeping enough of the original face data to look natural and stay consistent across frames.
Processor Order
FaceFusion runs its processors in order. The recommended sequence is:
- face_swapper — does the actual identity transfer
- face_enhancer — restores texture and detail
- expression_restorer — recovers micro-expressions (optional, adds processing time)
If you are using all three, this order generally gives the best results.
Processing Long Videos (Over 5 Minutes)
Long videos are where FaceFusion struggles the most. The program extracts every single frame to your hard drive before processing starts. A 30-minute video at 30fps means 54,000 individual image files. This eats up disk space, RAM, and if anything goes wrong halfway through, you have to start over from scratch.
The Best Approach: Split the Video Into Segments
This is the most reliable method, recommended by the community and acknowledged by the developer.
- Split your video into 1–2 minute segments using a free video editor like DaVinci Resolve, or with FFmpeg from the command line
- Process each segment in FaceFusion with the same settings
- Rejoin the segments in your video editor
Why this works: Each segment uses a manageable amount of disk space and RAM. If one segment fails, you only redo that one segment instead of the entire video. You can even process multiple segments at the same time if your GPU has enough VRAM.
Watch Your Disk Space
FaceFusion's temp folder can grow very large during processing. For a long video, it can easily hit 20-50 GB of temporary files. Make sure you have enough free space, and consider pointing the temp folder to a fast drive:
In the CLI, use:
--temp-frame-directory /path/to/fast/drive
The "20-Second Limit" Problem
Some users report that their output is mysteriously cut off at 20 seconds. This is usually one of two things:
- The Gradio UI preview has a length limit. Use the CLI (command line interface) or headless mode for full-length videos:
python facefusion.py headless-run - Trim frame settings are accidentally set. Check that
trim_frame_startandtrim_frame_endare not limiting your output.
No Sound in the Output Video
You processed your video, everything looks great, you play it back and... silence. The video plays fine but there is no audio at all.
The Most Likely Cause: FLAC Audio Encoder
Starting from recent versions, FaceFusion changed its default audio encoder from AAC to FLAC. FLAC is a lossless audio format — technically higher quality — but many video players, phones, and social media platforms cannot play FLAC audio inside an MP4 video file. The video appears to have no sound, but the audio is actually there — it is just in a format your player cannot read.
The fix: Change the output audio encoder back to AAC:
- In the UI: Look for Output Audio Encoder and set it to aac
- In facefusion.ini: Add
output_audio_encoder = aac - In the CLI: Add
--output-audio-encoder aac
Other Causes
- "Skip Audio" is checked. Look in the UI for a checkbox labeled "Skip Audio" and make sure it is unchecked.
- Output Audio Volume is set to 0. If you see an audio volume slider, make sure it is at 100 (or just remove the
--output-audio-volumesetting entirely). - FFmpeg version issue. If you are on an older version of FaceFusion, update it. Older versions had bugs with FFmpeg 7.x that caused audio to silently fail.
Audio Encoder Compatibility
| Encoder | Works Everywhere? | Quality | Recommendation |
|---|---|---|---|
| aac | Yes — phones, browsers, social media | Good | Use this for most videos |
| flac | No — many players skip it | Lossless | Only if you need perfect audio quality |
| libopus | Most modern players | Excellent | Good alternative to AAC |
The Face Looks Weird Near Hands, Hair, or Glasses
Sometimes the face swap looks perfect — until someone raises their hand near their face, or their hair falls across their forehead, or they are wearing glasses. Suddenly the swap looks broken: hands get warped, hair gets strange coloring, glasses disappear into the skin.
This problem is called occlusion — it happens when something is in front of the face, and FaceFusion tries to swap the face without realizing that part of it is covered.
Fix 1: Turn On the Occlusion Mask
This is the most important fix. By default, FaceFusion uses a simple "box" mask that covers the entire face rectangle. This box does not know about hands, hair, or glasses.
Switch to occlusion mask mode:
- Face Mask Types: Set to occlusion
- Face Occluder Model: Set to xseg_2 (the most accurate occlusion model)
The occlusion mask uses AI to detect objects covering the face and preserve them during the swap.
Fix 2: Adjust Face Mask Padding
If you see unnatural edges at the forehead, chin, or sides of the face, try increasing the Face Mask Padding values slightly:
- Top padding: Increase by 0.05 if the forehead looks wrong
- Bottom padding: Increase by 0.05 if the chin/jaw looks wrong
This extends the blending area so the swap fades in more naturally.
Fix 3: Use the Face Debugger
If you are having trouble figuring out exactly what is going wrong, enable the face_debugger processor. It shows you:
- A box around where FaceFusion thinks the face is
- Dots on the facial landmarks (eyes, nose, mouth)
- The mask boundary
This visual overlay helps you understand why certain frames look wrong, so you can adjust your settings more precisely.
Common Error Codes and What They Mean
When something goes wrong, FaceFusion does not always give you a helpful error message. Here are the errors people hit most often and what to do about each one.
"Processing stuck at 100% Analysing"
What happened: FaceFusion finished scanning your video but did not start the actual face swap. This usually means the NSFW content filter blocked your video.
What to do: Check our guide on how the FaceFusion NSFW filter works for a detailed explanation.
"CUDA out of memory"
What happened: Your GPU ran out of video memory. FaceFusion tried to use more VRAM than your graphics card has.
What to do:
- Reduce Execution Thread Count to 1
- Set Video Memory Strategy to strict
- Lower the video resolution
- Close other GPU-heavy programs
"merging video failed"
What happened: FFmpeg could not combine the processed frames back into a video file.
What to do:
- Make sure FFmpeg is properly installed (run
ffmpeg -versionin your terminal to check) - Try switching the Output Video Encoder to
libx264 - Make sure you have enough free disk space for the output file
"validating source for hyperswap failed"
What happened: The HyperSwap model file is corrupted or was only partially downloaded.
What to do:
- Go to your FaceFusion installation folder
- Find the
.assets/models/directory - Delete any file that starts with "hyperswap"
- Restart FaceFusion — it will download the model again from scratch
"Copying image failed"
What happened: FaceFusion could not save the output file, usually because of a folder permissions issue.
What to do:
- Make sure the output folder exists
- Try changing the output path to a different folder (like your Desktop)
- On Pinokio installations, outputs sometimes go to an unexpected location — check the Pinokio files directory
cv2.error about "resize"
What happened: OpenCV (the image processing library FaceFusion uses) encountered a frame with unusual dimensions.
What to do:
- Update OpenCV:
pip install --upgrade opencv-python - If the error persists, try a different Face Detector model
- Pre-process the video to ensure all frames have consistent dimensions
Quick Fixes That Solve Most Problems
Before diving deep into specific settings, try these basic steps. They fix a surprising number of issues:
- Update FaceFusion to the latest version. Many bugs are fixed in each release.
- Update Python to the recommended version (check the official docs for which version).
- Clear the Python cache. Delete the
__pycache__folders inside your FaceFusion installation directory. - Verify FFmpeg is installed. Run
ffmpeg -versionin your terminal. If it is not found, you need to install it. - Update your GPU drivers. Old NVIDIA drivers are a common cause of CUDA errors.
- Restart FaceFusion after changing settings. Some settings only take effect on restart.
Still Stuck?
If you have tried everything above and your video still is not working, there is an easier option: skip the local installation entirely and use FaceFusion online. It runs in your browser with no setup, no installation, no driver issues, and no command line. Upload your video, pick a face, and you are done.
Try FaceFusion Online — Free, No Download Required
Frequently Asked Questions
Why does the face flicker in my FaceFusion video?
Face flickering happens when FaceFusion's face detector cannot find a face on certain frames. This is usually caused by head movement, bad lighting, or the Reference mode being too strict. The most effective fix is switching Face Selector Mode from "Reference" to "One," and lowering the Face Detector Score to 0.3. See the full flickering section above for all available fixes.
How do I speed up FaceFusion processing?
The biggest speed improvement comes from using your GPU instead of your CPU — set Execution Provider to "cuda" (NVIDIA) or "coreml" (Apple Silicon). Beyond that, use FFmpeg 7.0.2 or earlier, exclude FaceFusion's temp folder from antivirus scanning on Windows, and keep Pixel Boost at 512 instead of higher values.
Why is there no sound in my FaceFusion output?
FaceFusion's default audio encoder was changed to FLAC, which many players cannot play inside MP4 files. Change the Output Audio Encoder to "aac" to fix this. Also check that "Skip Audio" is not enabled in the UI.
What GPU do I need for FaceFusion?
For comfortable video face swapping, you need an NVIDIA GPU with at least 8 GB of VRAM. An RTX 3060 12GB (~$300) is the entry-level recommendation. For faster results, an RTX 4060 Ti 16GB or higher is ideal. AMD GPUs work on Linux with ROCm but are not supported on Windows.
Is there an easier alternative to running FaceFusion locally?
Yes. FaceFusion.co offers an online version that runs entirely in your browser. There is no installation, no GPU required, no Python, no command line. You upload your video and source face, and the face swap is done for you on cloud servers. It is free to start with no watermark.